Para Español, de clic aquiHow to: Setup your TRIAL service - instructions
For a better view, use Full Screen mode
Purpose:
The purpose of this article is to show how to successfully start using the trial account and enabling the services by creating a channel or publishing point on our servers using Flash or Windows Media either for Live or On Demand.
If you don’t have an account, please go to here to Create a Trial account.
Step 1. Proceed to login to with your e-mail and password https://login.netromedia.com/Users/Login.aspx.
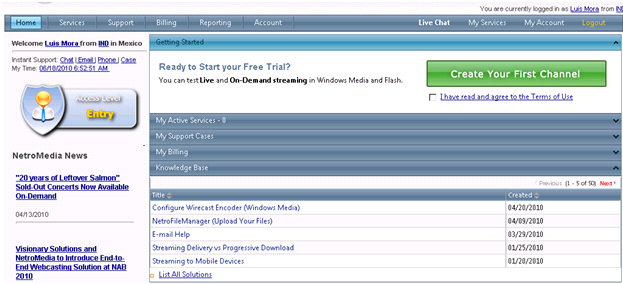
Step 2. This will take you to the NetroPortal Homepage.

Step 3. Please read our Terms and Conditions by clicking on the “I have read and agree to the Terms of Use" link.
Step 4. Put a check mark on the "I have read and agree to the terms of use" once you have read the terms and conditions.
Step 5. Click on the Create Your First Channel green button.
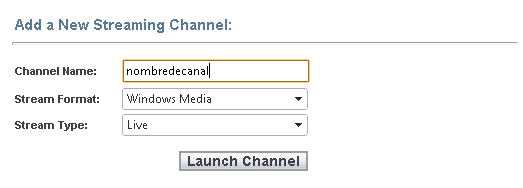
Step 6. Now create your publishing point or channel.
-
- Channel Name: Type in the name for your channel with number and letters only.
- Stream Format: Select the format that you wish to stream in; Only Flash and Windows Media can be selected. If you wish to have any another type, please get in touch with your account manager.
- Stream Type: Select if you need to stream in Live or On Demand.

Step 7. Once you have filled everything, click on the “Launch Channel” button.
Step 8. Fill in the information on the next page for the publishing point or channel you have just created.
- Publishing Point Name: Type in the channel name. By default, the previous name provided will be typed in.
- Stream Type: Select the type of broadcast will be performing PUSH or PULL (This only applies to Windows Media) Push or Pull?
- Publishing Point Source: Option will appear if PULL is selected. Enter the Video/Audio Source link eg. http://189.135.143.110:8080, http://mystreamlink.com:8080
Note: The rest of the settings are optional.
- Stream Meta Title: Enter a Title as you would like to display in your NetroPlayer
- Stream Meta Description: Enter a Description of your Stream, as you would like to display in your hosted page
- Stream Meta Copyright: Enter your copyright information: e.g. NetroMedia 2009
- Stream Meta Abstract: Enter the text you would like displayed when a user hovers over the mouse over your stream Description.
- Stream Meta Keywords: Enter Keywords associated with your stream eg, sports, radio, company name
- Stream Meta URL: Enter your related stream website.
Step 9.Click on the Save button.
You should now be able to see the settings for you to successfully configure you encoder.
Other FAQ's you might be interested:
If you found this FAQ helpful please rate it using the stars below: